What's "EnableVariableWidth(MyFont); do?"
Remember those annoying gaps in between the letters in our text function? Well this builtin lets us remove the gaps and making it look a little nicer.
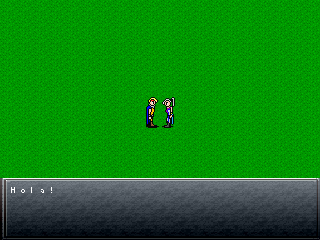
 With Variable Width Enabled.
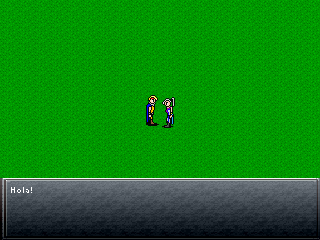
 Without
Before We Begin:
Since we now know how to use fonts, images and text, there are few time saving techniques we can use to
help make our coding experience a little easier.
Fonts:
These days memory is "cheap". That means we really don't have to worry about freeing/loading fonts
every time we have to use them. A good practise is to just create some global variables for fonts and load them
in our autoexec() function.
int plr; // Our player variables
int MyFont; // Our global fnt variable

void Autoexec()
{
	MyFont = LoadFont("smallfont1.gif");
	EnableVariableWidth(MyFont); // Make the gaps go away.
	map("tutorial.map");
}
int MyFont = LoadImage("smallfont1.gif");
AND
freeFont(MyFont);
In your Textbox function.
What's "EnableVariableWidth(MyFont); do?"
Remember those annoying gaps in between the letters in our text function? Well this builtin lets us
remove the gaps and making it look a little nicer.
With Variable Width Enabled.
Without
void PutText(int x, int y, string txt)
{
	PrintString(x,y,screen,MyFont,txt);
}
PrintString(10,10,screen,MyFont,"Hello!"); // Long and order-filled
PutText(10,10,"Hello!"); // Short and sexy.
Much Simpler, no?
On With The Menu!:
A basic menu will have, at its core, the same idea behind our textfunction. We want a bunch of stuff to display as long
as our player wants it to. In addition to that, we need to be able to select sub-menu's and activate them, such as Items, Equip, etc.
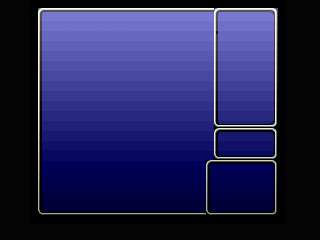
To start off, I've created (read: blatantly ripped! :D) a basic menu background. (A cookie to whomever can figure out which game I got it from!),
which we'll use as our main background. Again, the set up is the same as when we made the textbox.
void Menu()
{
	int MenuBg = LoadImage("menu.pcx"); // Load Background image
	while(!b2) // While Alt is NOT pressed
	{
		Render(); // Refresh the screen
		Rectfill(0,0,320,240,RGB(4,4,4),screen); // Create a black rectangle to hide the map
		Blit(30,0,MenuBg,screen); // Show Menu
		ShowPage(); //
	}
	Unpress(2);
	freeImage(MenuBg);
}
First Thing's First:
Before we add on to the menu, let's take a look at what we have so far!
In many an RPG (actually...pretty well all of them) the menu can be called from a map using a button. So let's do that too!
Open up "tutorial.vc" and in our MapIniti() function, add the line:
HookButton(4,"Menu");This is a call to a Builtin function that sets another function to be called when a "Button" is pressed. In this case we're saying "b4", which by default is the Space Bar, on your keyboard.
void MapInit()
{
	player = EntitySpawn(5,5,"darin.chr"); // Spawn the entity
	SetPlayer(player); // Give control to the player
	HookButton(4,"Menu"); // Make our menu callable from the map
}
Save it, load it, and when you're in game try pressing space. Your menu should now appear, and a disappear when you press alt.
Did you notice something a little odd?: While we're on the topic there is something to watch out for. In our function we don't specify that while the menu is all ready open, we don't want to be able to call the menu function again. Did you find yourself having to press "alt" a few times before the menu disappeared? This is because you may have accidently hit the Space Bar one too many times opening up multiple instances of the menu. The more "menu's" open, the more we have to close. To prevent this, we "UnHook" the button we assigned the Menu to after we've opened it, and then "rehook" it, once we're done in the menu. Like so:
void Menu()
{
	HookButton(4,""); // UnHook b4 from the Menu function
	int MenuBg = LoadImage("menu.pcx"); // Load Background image
	while(!b2) // While Alt is NOT pressed
	{
		Render(); // Refresh the screen
		Rectfill(0,0,320,240,RGB(4,4,4),screen); // Create a black rectangle to hide the map
		Blit(30,0,MenuBg,screen); // Show Menu
		ShowPage(); //
	}
	Unpress(2);
	freeImage(MenuBg);
	HookButton(4,"Menu"); // Rehook the menu to b4
}
And here's what it should look like:
Menu's Need Options!
The whole purpose of a menu is to give a choice of things you either want, or want to do. That's why it's called a menu! :D So in it's
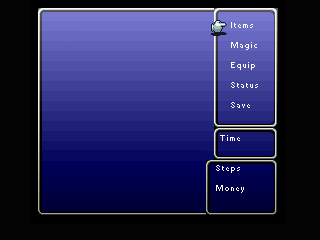
current state our menu is pretty useless. So let's add some options to it: I'm going to pick 5 simple ones that generally appear in some form
in a majority of RPG's, Items, Magic, Equip, Status and Save.
Using our fancy new PutText() function, I'll add these options to our menu, and heck, while I'm at it, let's put a spot for Money, Steps, and Time.
void Menu()
{
	HookButton(4,""); // UnHook b4 from the Menu function
	int MenuBg = LoadImage("menu.pcx"); // Load Background image
	while(!b2) // While Alt is NOT pressed
	{
		Render(); // Refresh the screen
		Rectfill(0,0,320,240,RGB(4,4,4),screen); // Create a black rectangle to hide the map
		Blit(30,0,MenuBg,screen); // Show Menu
		PutText(230,20,"Items"); // Display choices
		PutText(230,40,"Magic");
		PutText(230,60,"Equip");
		PutText(230,80,"Status");
		PutText(230,100,"Save");
		PutText(220,133,"Time");
		PutText(215,163,"Steps");
		PutText(215,183,"Money");
		ShowPage(); //
	}
	Unpress(2);
	freeImage(MenuBg);
	HookButton(4,"Menu"); // Rehook the menu to b4
}
We have no way of displaying the actual Time, Money, or steps taken, at this point, but we can at least set it up so that when we do, we know where to put it.
The Cursor!:
Cursors are basically a "must have" part of a menu, since it lets us know what option we might be choosing. It'd be a tad bit frustrating otherwise...
At any rate, cursors are easy enough to load, but manipulating them, that is, making them move when the player tells it too, can be a bit tricker.
I've included a cursor, "pointer.pcx" which I also *cough*stole*cough* from the same game as the menu pic.
When we break it down, this is what we want to do with a cursor:
void Menu()
{
	HookButton(4,""); // UnHook b4 from the Menu function
	int MenuBg = LoadImage("menu.pcx"); // Load Background image
	int Cursor = LoadImage("pointer.pcx"); // Load the Cursor Image
	int cY = 1; // Keeps track of where on the screen the cursor is, and sets it to its default position upon loading
	while(!b2) // While Alt is NOT pressed
	{
		Render(); // Refresh the screen
		Rectfill(0,0,320,240,RGB(4,4,4),screen); // Create a black rectangle to hide the map
		Blit(30,0,MenuBg,screen); // Show Menu
		PutText(230,20,"Items"); // Display choices
		PutText(230,40,"Magic");
		PutText(230,60,"Equip");
		PutText(230,80,"Status");
		PutText(230,100,"Save");
		PutText(220,133,"Time");
		PutText(215,163,"Steps");
		PutText(215,183,"Money");
		ShowPage(); //
	}
	Unpress(2);
	freeImage(MenuBg);
	freeImage(Cursor);
	HookButton(4,"Menu"); // Rehook the menu to b4
}
I called the 2nd variabled cY because of how we'll be moving the cursor. We want it to move up and down, so we'll be manipulating it's y-coord. Meaningful variable names = good times for all. :D
void Menu()
{
	HookButton(4,""); // UnHook b4 from the Menu function
	int MenuBg = LoadImage("menu.pcx"); // Load Background image
	int Cursor = LoadImage("pointer.pcx"); // Load the Cursor Image
	int cY = 1; // Keeps track of where on the screen the cursor is, and sets it to its default position upon loading
	while(!b2) // While Alt is NOT pressed
	{
		Render(); // Refresh the screen
		Rectfill(0,0,320,240,RGB(4,4,4),screen); // Create a black rectangle to hide the map
		Blit(30,0,MenuBg,screen); // Show Menu
		TBlit(210,(20*cY), Cursor, screen); // Display Cursor
		PutText(230,20,"Items"); // Display choices
		PutText(230,40,"Magic");
		PutText(230,60,"Equip");
		PutText(230,80,"Status");
		PutText(230,100,"Save");
		PutText(220,133,"Time");
		PutText(215,163,"Steps");
		PutText(215,183,"Money");
		ShowPage(); //
	}
	Unpress(2);
	freeImage(MenuBg);
	freeImage(Cursor);
	HookButton(4,"Menu"); // Rehook the menu to b4
}
Up until this point whenever we've displayed an image on the screen we've used Blit(). For the Cursor we're using TBlit(). The difference
 between Blit() and TBlit() is that in TBlit() anything on the image that is Death Magenta will be erased
when verge displays it. Blit() doesn't do this. With our cursor, we want that color to disappear. (The "T" in TBlit stands for Transparency).
between Blit() and TBlit() is that in TBlit() anything on the image that is Death Magenta will be erased
when verge displays it. Blit() doesn't do this. With our cursor, we want that color to disappear. (The "T" in TBlit stands for Transparency).
Next in the function call, instead of just giving it a straight y-coordinate, we've added a little math.
(20*cY). That is, 20 times the value of cY.
Did you catch it? That's right! Right off the bat we've set the value of "cY" to 1. This means that when verge evaluates the math, the cursor is
drawn at the x-coord 210, and y-coord 20. (20*(1))=20.
If we were to increase the value of "cY" the position would change. For example; when cY = 2 the cursor appears at y-coord 40. (20*(2))=40, when cY = 3, y = 60. (20*(3))=60, etc. etc.
So now we know what we must do. We must add a way for the player to be able to change the value of "cY" while playing the game and in your menu!
What Happens "If" I Press *This Button*?:
In a lot of cases while programming, we'll only want certain things to happen "if" certain conditions are met. That is:
If Character HP is 0
Then The Character is Dead
Otherwise
The Character is alive
Verge gives us a very handy Control Structure known as the IF Statement that allows us to process things in the above fashion.
Generally everything moveable in an RPG is controlled by the same thing you use to move your character around. We'll do the same. (In our case, the arrows keys
on your keyboard). In this case we only want the cursor to move if either the Up, or Down keys is pressed. If Up is pressed, move the cursor up, and vice versa. We'll be using
a couple of If Statements to see if the player has indeed pressed one of these keys.
So let's add the code, and I'll explain what I've done after.
void Menu()
{
	HookButton(4,""); // UnHook b4 from the Menu function
	int MenuBg = LoadImage("menu.pcx"); // Load Background image
	int Cursor = LoadImage("pointer.pcx"); // Load the Cursor Image
	int cY = 1; // Keeps track of where on the screen the cursor is, and sets it to its default position upon loading
	while(!b2) // While Alt is NOT pressed
	{
		Render(); // Refresh the screen
		Rectfill(0,0,320,240,RGB(4,4,4),screen); // Create a black rectangle to hide the map
		Blit(30,0,MenuBg,screen); // Show Menu
		TBlit(210,(20*cY), Cursor, screen); // Display Cursor
		PutText(230,20,"Items"); // Display choices
		PutText(230,40,"Magic");
		PutText(230,60,"Equip");
		PutText(230,80,"Status");
		PutText(230,100,"Save");
		PutText(220,133,"Time");
		PutText(215,163,"Steps");
		PutText(215,183,"Money");
		ShowPage(); //
		if(UP)
		{
			Unpress(5);
			cY--;
		}
		if(DOWN)
		{
			Unpress(6);
			cY++;
		}
	}
	Unpress(2);
	freeImage(MenuBg);
	freeImage(Cursor);
	HookButton(4,"Menu"); // Rehook the menu to b4
}
UP and DOWN are like the B1, B2, B3 and B4 variables. They represent the arrow keys on your keyboard (There is also LEFT and RIGHT).
if(UP)It's checking to see if the UP Key is pressed. If it is, then it'll execute whatever is inside the brace. In our case, it will first for the key to become Unpressed (Unpress(5); Button 5 = UP) and then decrease the value of cY by 1. If we didn't have Unpress() in there, even the slightest "tap" of our arrow key will make the pointer fly off the screen! And no one wants that.
if(DOWN)It's doing the exact same thing, only, it's checking if the down arrow key is being pressed, and if so, "increase" the value of cY.
Looping the Cursor:
In addition to being able to move the cursor, we want to make sure that it doesn't go "out of bounds". That is, if you press Down again, while the cursor is beside "Save",
we don't want the cursor to move down anymore. Instead we can either make it so it goes back to "Items", or just not move at all. We'll make it so it loops.
The highest value without going "out of bounds" that cY can be is 5. Likewise, the lowest value it can be, without making the cursor go off screen, is 1. So, it
looks like we'll need another If Statement somewhere in there!
Multiple-If's:
You can, in fact, have an If within an If, or a loop within a loop, respectively. (Be carefull with the looping...it can cause bad jube-jube if done incorrectly)
In some cases you'll find yourself wanting to check a couple of conditions:
If Down is pressed
	Increase the value of cY
	If cY's value is greater than 5
		reset cY's value
This is the same idea that we'll be using to make our cursor "loop" when it reaches "Save" or "Items".
void Menu()
{
	HookButton(4,""); // UnHook b4 from the Menu function
	int MenuBg = LoadImage("menu.pcx"); // Load Background image
	int Cursor = LoadImage("pointer.pcx"); // Load the Cursor Image
	int cY = 1; // Keeps track of where on the screen the cursor is, and sets it to its default position upon loading
	while(!b2) // While Alt is NOT pressed
	{
		Render(); // Refresh the screen
		Rectfill(0,0,320,240,RGB(4,4,4),screen); // Create a black rectangle to hide the map
		Blit(30,0,MenuBg,screen); // Show Menu
		TBlit(210,(20*cY), Cursor, screen); // Display Cursor
		PutText(230,20,"Items"); // Display choices
		PutText(230,40,"Magic");
		PutText(230,60,"Equip");
		PutText(230,80,"Status");
		PutText(230,100,"Save");
		PutText(220,133,"Time");
		PutText(215,163,"Steps");
		PutText(215,183,"Money");
		ShowPage(); //
		if(UP)
		{
			Unpress(5);
			cY--;
			if(cY<1) // If cursor is on "Items" and up is pressed, put the cursor on "Save"
				cY=5;
		}
		if(DOWN)
		{
			Unpress(6);
			cY++;
			if(cY>5) // If cursor is on "Save" and down is pressed, put the cursor on "Items"
				cY=1;
		}
	}
	Unpress(2);
	freeImage(MenuBg);
	freeImage(Cursor);
	HookButton(4,"Menu"); // Rehook the menu to b4
}
How Come There Are No Braces in Those Other If's?:
If(UP)A lot of stuff is happening if up is being pressed. Therefore, we need those braces to make sure all our code related to the up key, is associated with the up key being pressed. Verge will also spit out an error at you if you don't. ~_^
if(cY<1)We're only checking, and reseting (if necessary), one value, so verge doesn't need to be reminded that it belongs to that "If". It's the only thing that *can* belong to it. Make sense? I'm sure there's a better more technical detail of it, but, to summarise:
I thought this was a "Basic" menu?:
It is, and we're almost done I promise. The last thing we need to do is make it so we can choose
the options, once there in place. For now, since we haven't made an Items System, Equip System, Party System, Magic System, OR Save System,
we'll fake it like when we made Crystal talk for the very first time way back in Chapter 3.
This whole menu thing is a lot to take in though, so go grab a pizza pocket, and a coke. Take a 15 minute break, or however long you need. I don't have anywhere
to be today so I can wait.
Switches; A bunch of "If's" all in one!
You took too long, and I got called away. Sorry, you're on your own for the rest.
I kid, I kid. Let's get back to work.
If you read the V3 Manual section I linked to back when I first
introduced If Statements (you did read it, didn't you?) you probably noticed that you could do a few more things with it than what we did. Ie. the Else If statement, and the Else statement.
You may have also noticed something about Switches and Cases. We'll get into what these are, since we'll be using them, in a sec. First let's see where we'd use Else if and Else.
In some cases, we want to test for more than one thing. Rather, to check one variable to see if they're different values, and do something depending on that value.
If cY==1
	Call ItemsMenu
else if cY==2
	Call MagicMenu
else if cY==3
	Call EquipMenu
else cY==4
	Call StatusMenu
else
	Call SaveMenu
In code this looks like:
if(cY==1)
	ItemsMenu();
else if(cY==2)
	MagicMenu();
else if(cY==3)
	EquipMenu();
else if(cY==4)
	StatusMenu();
else
	SaveMenu();
There are a few things to note here; One is using "==" instead of just "=". When comparing values, (eg. Is cY equal to 1?) we use "==" to compare the two. That's coding jibba-jabba, and we won't concern ourselves too much with it. (Not the aim of the tutorial! :D)
Verge Switch (Think Verge):
There's actually another way to accomplish the same goal as a bunch of Else if's. It's called the Switch Statement which, essentially
accomplishes the same thing as if+else if, but can be easier to use for organization or just plain cleaner code.
A Switch Statement looks like this:
Switch(var)
{
	case 0:
	DoStuff();

	case 1:
	DoOtherStuff();

	case 2:

	DoMoreStuff();
}
This is the same as if we were to say:
if(var==0)
	DoStuff();
else if(var==1)
	DoOtherStuff();
else
	DoMoreStuff();
We're testing one variable. "var". We want to do different things depending on what it's value is. If it's 0, DoStuff(), if it's 1, DoOtherStuff, etc. etc. Think of it like this:
Test variable "var":
	when it is 0:
	DoStuff();

	When It is 1:
	DoOtherStuff();

	When it is 2:
	DoMoreStuff();
How does this relate to our menu? Well, depending on what the value of "cY" is, we want to open a different sub-menu. (Items, Equip, etc.). So we must test for different conditions when a player chooses one. Let's add it to our code! Again, I'll fake the sub-menu's since we don't have any yet. XD
void Menu()
{
	HookButton(4,""); // UnHook b4 from the Menu function
	int MenuBg = LoadImage("menu.pcx"); // Load Background image
	int Cursor = LoadImage("pointer.pcx"); // Load the Cursor Image
	int cY = 1; // Keeps track of where on the screen the cursor is, and sets it to its default position upon loading
	while(!b2) // While Alt is NOT pressed
	{
		Render(); // Refresh the screen
		Rectfill(0,0,320,240,RGB(4,4,4),screen); // Create a black rectangle to hide the map
		Blit(30,0,MenuBg,screen); // Show Menu
		TBlit(210,(20*cY), Cursor, screen); // Display Cursor
		PutText(230,20,"Items"); // Display choices
		PutText(230,40,"Magic");
		PutText(230,60,"Equip");
		PutText(230,80,"Status");
		PutText(230,100,"Save");
		PutText(220,133,"Time");
		PutText(215,163,"Steps");
		PutText(215,183,"Money");
		ShowPage(); //
		if(UP)
		{
			Unpress(5);
			cY--;
			if(cY<1) // If cursor is on "Items" and up is pressed, put the cursor on "Save"
				cY=5;
		}
		if(DOWN)
		{
			Unpress(6);
			cY++;
			if(cY>5) // If cursor is on "Save" and down is pressed, put the cursor on "Items"
				cY=1;
		}
		if(b1)
		{
			Unpress(1);
			switch(cY)
			{
				case 1: // If Cursor is on "Items"
				MessageBox("Items!");

				case 2: // If Cursor is on "Magic"
				MessageBox("Magic!");

				case 3: // If Cursor is on "Equip"
				MessageBox("Equip!");

				case 4: // If Cursor is on "Status"
				MessageBox("Status!");

				case 5: // If Cursor is on "Save"
				MessageBox("Save!");
			}
		}
	}
	Unpress(2);
	freeImage(MenuBg);
	freeImage(Cursor);
	HookButton(4,"Menu"); // Rehook the menu to b4
}
Okay, so what was added? Well, a new If Statement to check if the player has hit the "Enter" key (Button 1), and inside a Switch Statement
to determine what to do depending on the value of cY. In each case, we call the fake the version of our "Sub-menu's" (Just a message box that'll pop up).
And that, my friends, is your basic menu. We've now laid down the backbone of creating the part of a game that many a player will rely on during the most perilous of quests!
Pat yourselves on the back. You deserve it.
Summary:
This is what you now know: